This is a JPEG of 800kB and A4
This is a 42kb A4 TIFF
PhDr. Mgr. Jeroným Klimeš, Ph.D. 2006
Translated by DeepL from the Czech original article
If you scan the music notes or other black and white material well, not only is it possible to maintain the quality (resolution), but the resulting images can be as small as 100 kB.
|
|
I use the following procedure.
Scan
A well set up scanner is the basis of everything and saves a lot of work.
Four parameters need to be set:
Resolution- 300 dpi
Black & White Output - B/W, 1-bit
Threshold- automatically or fine tune a little
File extension (lossless compression) - TIF (compressed), BMP, GIF, PNG, but never JPG!
First we set the resolution - 300 dpi. Then the output type is black & white (black & white, B/W, 1 bit, etc. There are various abbreviations). I scan the first page and by trial and error set the threshold so that there aren't too many black dots on the page, so that it's a true black print on a white page. TIF output (preferably compressed). Then I scan one page at a time without readjusting.
Edit in GIMP
I open the images in a program that allows cropping and rotation, such as GIMP or Photoshop, and edit the pages - rotate, crop.
If you receive scanned images in JPG. You can't avoid the following pass, which can be relatively automated for books by doing the editing with Imagemagick, but it's still a lot of work to get everything right.
If the draft is really bad:
A) Convert from RGB to Grayscale (in GIMP menu Picture/Mode/Grayscale, Bild/Modus/Graustuffen - sorry, I have GIMP in German, so I'm just guessing the English names.)
B) Enlarge so that the A4 is 2500-3000 pixels wide (GIMP - Picture/Scale picture; Bild/Bild skalieren) This is for the following focus.
C) Focus (GIMP Filter/Improve/Unsharp masking; Filter/Verbessern/Uncharf Maskieren). The parameters are usually 5 points and there should be a sort of light border around the letters. This mimics the retina's function of amplifying the edges.

Parameters in Photoshop: Measure: 420; Radius: 7 points (slightly less than letter size); Threshold: 10 levels.
3) Adjust the levels (GIMP: Color/Levels; Farben/Werte) by moving the sliders past the bump so that the text stands out nicely and there are minimal dots.

The three small triangles is the level of black, white and center. For the black and white feathers and text, we put them all in one place, in the middle.
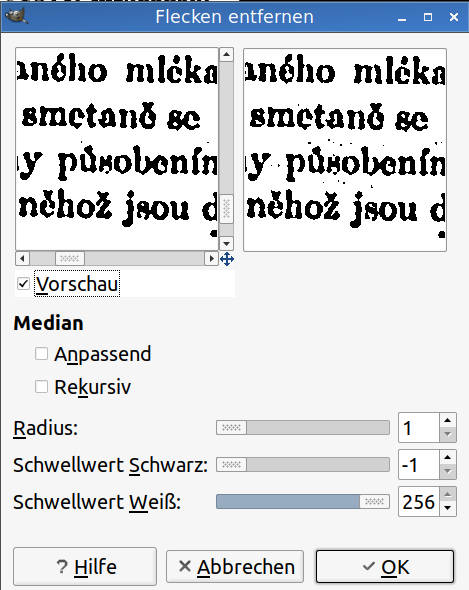
4) If there are still a lot of dots in the image, remove the dots (GIMP Filter/Improve/Remove stains; Filter/Verbessern/Flecken entfernen)
5) Convert to black&white (GIMP Picture/Mode/Indexed colors/Black&White; Bild/Modus/Indexiert/Schwartzweiß Palette)
6) Save or export as PNG or TIFF with CCITT Group 4 - Fax compression. I don't know if Photoshop can do this, it should.
Automated editing in ImageMagick
Clearly, these six steps would make us lose our minds if we had to do it picture by picture for the whole book. Automation is possible on the command line. Maybe macros still work in Photoshop, I don't know, I don't know the new versions. GIMP doesn't have macros. It's pointless when it works just as well on the command line:
Examples
sudo apt install imagemagick
install in Linux, but I think it can be installed in Windows as well.
convert -colorspace Gray -unsharp 6x6+4+0 -level 75%,76% -trim -format tiff‑compress group4 image_input.tiff image_output.tiff
mogrify -colorspace Gray -level 55%,56%,1 -trim -format tiff -compress Group4 *.png
You have to make cuts by hand, but it's easy to cut pages in half. I recommend to do it before hand cuts:
mogrify -gravity northwest -crop 50%x100% -trim *.tiff
# left halves
mogrify -gravity southeast -crop 50%x100% -trim *.tiff
# right halves
So classic Linux - complex command preparation, but then a big time saver. You run it and in 5 minutes you have the whole book ready and have a coffee in between. In other words, even if you normally work in Windows, for this kind of professional work it's worth having one older Linux computer at home. I'm on Debian, it runs fast on almost anything.
Convert to PDF
In Linux, these are the two commands for which I have a macro that you can download:
tiffcp -x *.tiff temporal_manypages_document.tiff
# -x Force the output file to be written with PAGENUMBER value in sequence.
tiff2pdf -z -f -F -o resulting_document.pdf temporal_manypages_document.tiff
For JPG files, this conversion via ImageMagick is very economical:
convert image.jpg image.pdf
or more complicated
convert -units PixelsPerInch $(ls -v *.jpg *.jpeg *.JPG *.JPEG *.png *.PNG) -density 300 +repage output_file.pdf
I have a similar macro for that too. If you are interested in them, or have any other questions, please post.
In Windows this was done before PDF printer or via Adobe Acrobat, but I don't know the current state.
Edit ACDSee in Windows
I used to use ACDSee in Windows, but I don't know what state the newer versions are in.
I open the images in ACDSee.
I double-click it to switch to the Browse file list.
I select the images I want to convert.
Second mouse button: convert, TIF, Format setting, Resolution 300, Compression CCITT Group 4
So an 800kB image is 42kb. 5% size is a pretty good result and a big space saver.
An example of a book that I scanned and edited as follows
Emil Holan: The spark that conquered the world